

Remote work offers unmatched freedom, letting us collaborate from home, cafés, or coworking spaces. We rely on external storage, and knowing how to recover files from corrupted external hard drive is essential. Portable SSDs and high-capacity drives store client presentations, media, code, and financial records. But moving between locations increases the risk of hardware failures. One moment your drive works; the next, it may become unreadable or inaccessible, threatening your projects and deadlines.
Fortunately, drive failures don’t mean your work is lost. With PandaOffice Drecov, you can stabilize your system and recover important files before a minor glitch becomes a major disaster.
Why External Storage Volumes Corrupt in Mobile Environments
To address a storage failure effectively, you must understand why external drives corrupt in remote settings. Mobile workstations expose external drives to physical and logical environments that traditional desktop computers rarely experience.
When you run demanding workloads like compiling code or editing 4K video, your storage device undergoes intense read and write cycles. Several common factors disrupt these processes in a remote workspace:
- Ungraceful Volume Disconnections: Packing up your laptop quickly can lead to accidental cable pulls. If you disconnect a drive while a background application is caching data, you truncate the write cycle. This breaks the file system metadata.
- Fluctuating Power Supplies: Coffee shop USB ports or cheap travel hubs often deliver unstable voltage. Sudden drops in power disrupt the internal controller of the drive during crucial metadata updates.
- File System Metadata Collapse: Abrupt interruptions damage the Master File Table (MFT) on NTFS drives or the Allocation Table on exFAT systems. The physical data sectors remain completely intact, but the operating system loses the map required to locate and assemble your files.
Native First Aid for Unresponsive Remote Storage
When an external device acts up, do not rush to format the volume. Formatting creates a blank file system structure, which makes subsequent data retrieval significantly harder. Instead, use native administrative utilities to diagnose the connection and address basic logical layout conflicts.
Method 1: Verify Hardware Connections and Drive Visibility
Before executing deep diagnostic software routines, eliminate basic physical connectivity issues. Windows contains a dedicated utility called Disk Management to check raw hardware visibility.
- Press the Windows Key + X hotkey combination on your keyboard to reveal the Power User menu.
- Select Disk Management from the pop-up list to launch the system storage interface.
- Look through the visual layout panel to locate your external storage device.
If the volume appears in the list but lacks a drive letter, right-click the partition block. Select Change Drive Letter and Paths, click Add, choose an available letter like M:, and apply the changes. This quick fix can restore volume accessibility instantly.
Method 2: Execute an Elevated System File Check
If the storage volume has a drive letter but remains unreadable, use the native Check Disk (chkdsk) command-line utility. This administrative tool repairs basic structural errors within the file allocation metadata.
- Press the Windows Key to activate your search bar, type cmd, and right-click Command Prompt.
- Select Run as administrator to launch the terminal with elevated system privileges.
- Type the exact command string: chkdsk M: /f (Be sure to replace M: with your specific external drive letter).
- Press the Enter key to start the diagnostic scan.
The /f parameter commands the system engine to resolve logical errors found on the storage disk index.
Critical Warning: If your external drive makes clicking, grinding, or ticking sounds, close the command terminal immediately. Physical hardware failures require professional cleanroom intervention. Forcing a physically damaged drive to run intensive software scans will permanently destroy the internal media surfaces.
Part 2: Advanced Workplace Rescue with PandaOffice Drecov
Native system repair tools can fix basic directory misalignments, but they are not built for severe file metadata collapse. When system scripts fail to rebuild a broken file table, stop running generic repair commands. Repeatedly writing data to a damaged drive can overwrite the very project assets you need to save.
To safely bypass operating system restrictions without risking your client data, you need a specialized, read-only data extraction tool. PandaOffice Drecov provides a professional-grade file rescue solution tailored for high-stakes business environments.
Instead of relying on unstable operating system file trees, PandaOffice Drecov communicates directly with the raw storage sectors of your drive. The software scans the underlying storage layers to identify orphaned file signatures, reconstruct lost project directories, and pull out missing documents safely.
The Immutable Law of Workspace Data Safety
Before launching any advanced sector scan, you must observe the most critical rule of data preservation: Never save new files to the compromised storage device.
Important Warning: Do not download data recovery applications or store temporary local caches on the drive you intend to repair. This irresponsible activity will overwrite the invisible storage sectors holding your lost files. Always download and install PandaOffice Drecov on your primary laptop C: drive or an independent external flash stick to keep the recovery environment safely isolated.
Step-by-Step Business Asset Recovery Blueprint
PandaOffice Drecov streamlines file restoration into an efficient, professional workflow. Follow this simple three-step blueprint to recover files from corrupted external hard drive volumes quickly:
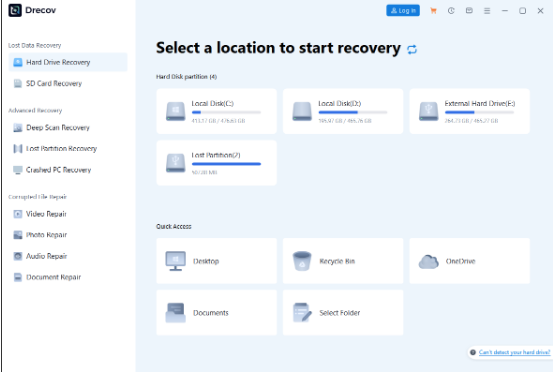
Step 1: Select the Drive or Device
Open PandaOffice Drecov on your workstation. Select the drive icon that matches your corrupted external storage volume and Click the Scan button.
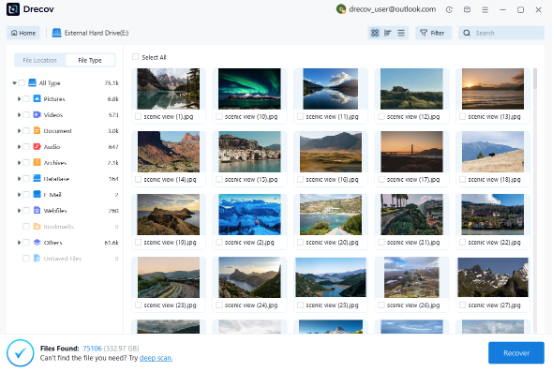
Step 2: Scan and Preview Lost Files
PandaOffice Drecov runs a rapid initial file check, followed immediately by an intensive deep sector scan. You can isolate target business formats like Documents or Media. If you need to find an exact contract or project folder, type the filename directly into the upper-right Search Bar to pinpoint it instantly.
Step 3: Recover Your Data Safely
Check the validation boxes next to the project directories, media assets, or client files you need to restore. Click the primary Recover command button.
Pro-Tip Warning: When choosing a save destination for your recovered data, select a completely healthy alternative drive or a secure cloud folder. Never save your rescued data back onto the corrupted external drive, as this will trigger severe sector overwriting and permanently destroy any remaining files.
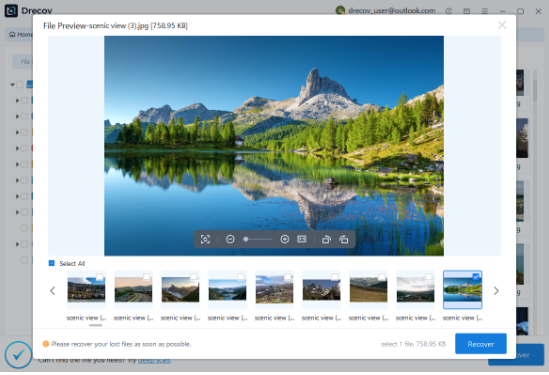
Once the software completes the extraction process, you can safely copy your files back into your active daily workflow and resume your remote operations without missing a beat.
Part 3: Future-Proofing Local Storage Against Workspace Data Disasters
Once your active project files are secure, take proactive steps to safeguard your remote setup against future storage failures.
- Optimize Local Removal Policies: Ensure Windows handles device disconnections safely. Open Device Manager (devmgmt.msc), expand Disk drives, right-click your external storage unit, and choose Properties. Under the Policies tab, select Quick removal (default) to disable system write caching on that external device. This policy ensures data writes directly to the disk, which prevents partition table crashes if a cable gets accidentally pulled during a busy day.
- Set Up a Quick Document Rescue Routine: Sudden system restarts can wipe out local AppData folders. Keep PandaOffice Drecov on your machine to quickly recover unsaved word document windows 11 caches before temporary office files disappear from your system drive entirely.
- Maintain the 3-2-1 Workspace Backup Rule: Keep three copies of your production files across two different media types, with at least one backup stored in an off-site cloud service like OneDrive or Google Drive.
Conclusion
Losing access to your client files right before an important deadline is a stressful experience for any remote worker. Fortunately, you can easily resolve minor logical glitches by checking connections in Disk Management and using native terminal commands like chkdsk.
When severe file system errors threaten your active projects, using a professional, read-only extraction engine like PandaOffice Drecov ensures your intellectual property remains safe. By practicing smart device habits, configuring your removal policies correctly, and keeping a reliable file recovery tool ready, you can protect your valuable digital assets and keep your remote business moving forward.
Note: This content is for page settings only and shall not be included in the article body.
Keyword:recover files from corrupted external hard drive
Meta Description:Learn how to recover files from corrupted external hard drive volumes safely and restore your remote workspace workflow with this expert guide.
Brief Summary: Don’t let data loss disrupt your remote work. This guide offers practical solutions to fix common storage issues and demonstrates how to safely recover files from corrupted external hard drive systems using PandaOffice Drecov.
